
This Documentation Vacation Mode hub covers holiday notices, scheduling, display placements, and customer notifications in PrestaShop.
The Vacation mode module lets PrestaShop merchants display customizable holiday and vacation notices across the storefront. It helps you inform customers about possible shipping delays, office closures, or seasonal breaks while keeping your shop fully open for orders.
The module works with PrestaShop shops from version 1.6.0 through 9.1. It supports multishop environments. See the Vacation Mode module page for product details and pricing.
Documentation Vacation Mode overview
Key Features
Multi-Location Storefront Messages
Show vacation notices in up to eight display locations: top banner, popup, home page, left column, product page, cart page, checkout page, and reassurance block. Each placement can have its own message, background color, and layout options.
Scheduled Vacations with Date Ranges
Set a start and end date for each vacation profile. The module activates and deactivates notices automatically based on your shop timezone. Leave dates empty to control visibility manually with the Activate: switch.
Multiple Vacation Profiles
Create separate vacation profiles for different events – for example, summer holidays and Christmas – using the tabbed interface and the + button. Multiple profiles can be active at the same time.
Popup Modal with Dismiss Option
Display a popup overlay on page load. Customers can click Don't show again to hide it for seven days in their browser before it reappears.
Styling Options
Customize each notice with background color, optional sticky banner (top or bottom), block margins, and Constrain block width: to match your theme's main content area.
Disable Add to Cart (Per Vacation)
Each vacation profile has a Disable Add to cart: switch. When enabled for an active vacation, purchase buttons are disabled and greyed out on the storefront and new cart additions are blocked. This does not enable PrestaShop catalog mode and does not disable checkout – customers who already have items in the cart can still proceed unless blocked by theme or other modules.
When Disable Add to cart is Yes, two additional options appear:
- Show explanation near add-to-cart buttons: – When Yes, visitors see why ordering is unavailable.
- Visitor message: – Multilingual text shown beside disabled purchase buttons. Leave empty to use the default: Add to cart is temporarily unavailable during our vacation. You can keep browsing – ordering will reopen soon.
On the product page, the message appears as a notice below the add-to-cart area. On category and search listings, a small ! icon appears next to each product; hovering or focusing it shows the full message.
The setting is saved per shop in multishop setups.
Supplemental Order Email
Optionally send an additional email when a customer places an order, informing them about possible processing delays during holidays. This is separate from PrestaShop's standard order confirmation email.
Back Office Active-Vacation Indicator
When at least one vacation profile is currently active, an orange Vacation mode badge appears at the top of the Back Office, linking directly to the module configuration.
Multishop Per-Shop Activation
In multishop setups, each vacation profile's Activate: setting is saved per shop, so you can run different vacation notices on different stores.
The configuration page layout shown in this Documentation Vacation Mode matches PrestaShop 1.7 and later.
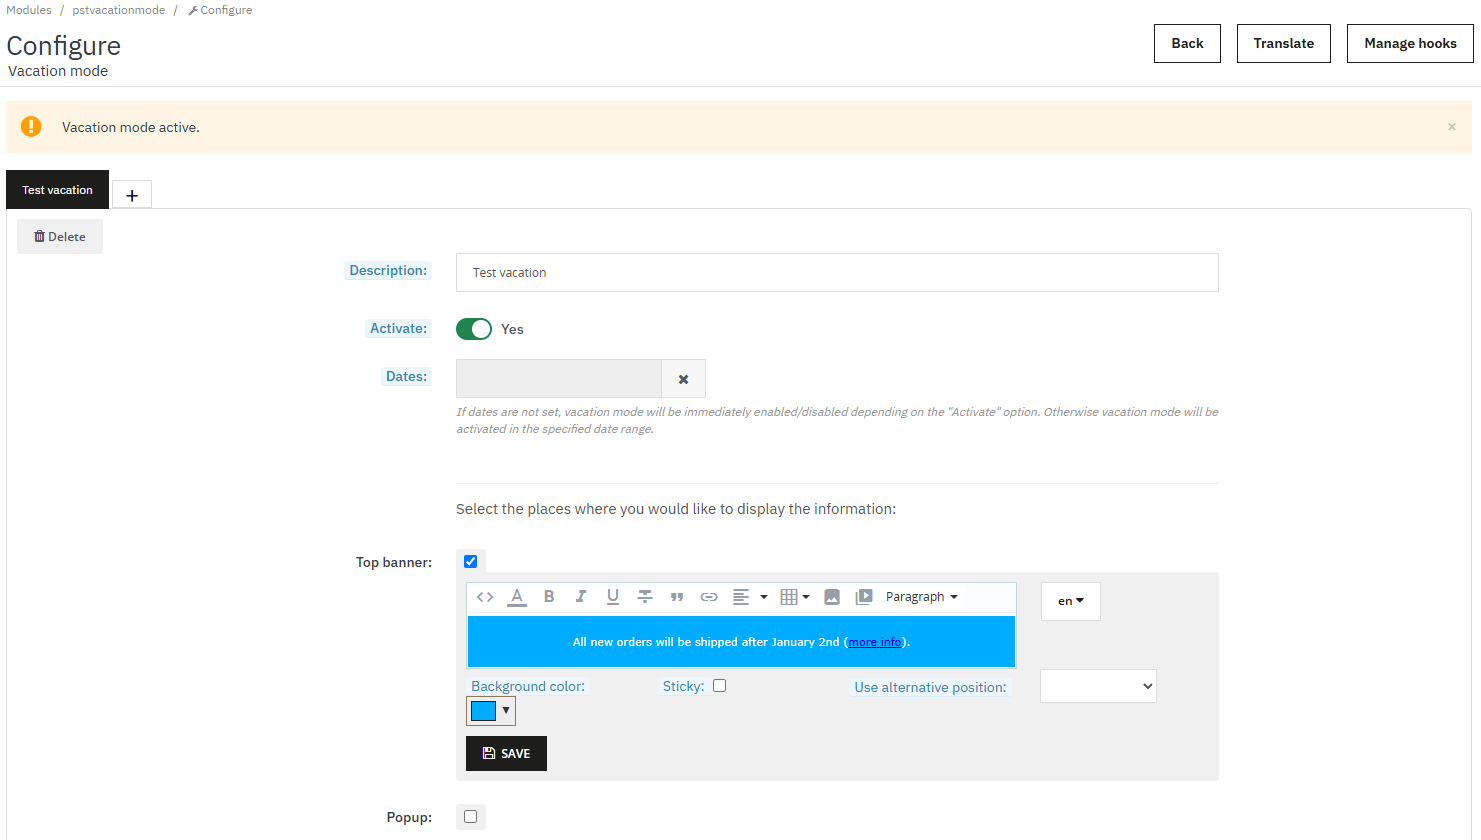
Open the module configuration from Modules → Module Manager → Vacation mode → Configure.
Quick Guide
At the top of the configuration page, a collapsible Quick guide panel provides step-by-step setup instructions. Click Hide at the bottom to collapse it; click (show) in the panel heading to expand it again.
Vacation Tabs
Each vacation profile appears as a tab. Tabs without a Description: are labeled Vacation #1, Vacation #2, and so on. Use the + tab to add a new vacation profile.
Placement Checkboxes and Save
Below the Description:, Activate:, Disable Add to cart:, and Dates: fields, checkboxes list all available display placements and the order email option. When you enable a checkbox, a text editor and styling options appear. Click Save on that block when finished. On an existing vacation tab, the Activate: switch, Dates: field, and Description: save automatically when changed. On a new + tab, click Create first before configuring placements.
Quick Start: Activating Vacation Mode
Follow these steps to publish your first notice. The rest of this Documentation Vacation Mode explains each feature in detail.
To display your first vacation notice:
- Open Modules → Module Manager → Vacation mode → Configure in the PrestaShop back office.
- On a vacation tab, check the placements where you want to show information – for example, Top banner: and Home page:.
- Enter your message in the text editor for each enabled placement. Adjust Background color: or other options if needed, then click Save.
- Set Activate: to Yes. Optionally set Dates: for a scheduled vacation period.
- If the notice appears lower than expected on the page, go to Design → Positions, select Vacation mode, and drag the module to the top of the relevant hook.
Common Use Cases
On the vacation tab, enable Home page:, enter your message, and click Save. Set Activate: to Yes. If the banner appears below other content, reorder the module on the displayHome hook via Design → Positions.
How to schedule vacation messages for specific dates
Set Activate: to Yes and choose a date range in Dates:. The notice becomes visible only while the current date falls within that range. See Scheduling vacations by date for timezone and end-of-day behavior.
How to display different messages on checkout vs product pages
Enable Product page: and Checkout page: (or Cart page:) on the same or different vacation tabs. Enter a different message for each placement and click Save on each block. Both can be active simultaneously.
Cart page: shows on the shopping cart page (displayShoppingCart). Checkout page: shows at the top of the order summary during checkout (displayCheckoutSummaryTop; use Custom checkout hook only on themes that need displayCheckout).
How to notify customers about holiday shipping delays without closing the store
Enable storefront placements such as Top banner: or Checkout page: with your delay message. Optionally enable Send email to the customer on order creation: to send a supplemental notice when orders are placed. Optionally enable Disable Add to cart: to disable purchase buttons during the vacation without closing the store, and turn on Show explanation near add-to-cart buttons: so customers understand why.
How to create separate summer and Christmas vacation notices
Click the + tab to add a second vacation profile. Give each tab a Description: (for example, "Summer 2026" and "Christmas 2026"). Configure placements and messages separately. Schedule each with Dates: or toggle Activate: manually.
How to fix a vacation message appearing at the bottom of the page
PrestaShop places newly installed modules at the bottom of hook output by default. Go to Design → Positions, select Vacation mode in the module filter, find the hook (for example, displayHome), and drag the module row to the top. See the Display Locations Reference for details.
Documentation Map
The Documentation Vacation Mode map below lists every Vacation Mode guide.
For detailed information on specific features, refer to the following guides:
- Review all display placements, styling options, and hook positions in the Display Locations Reference.
- Learn how to manage vacation profiles, schedule by date, and configure order emails in the Managing Vacation Profiles guide.
- For scheduling details, see Scheduling vacations by date.
- For order email setup, see Order email notifications.
Compatibility Notes
These Documentation Vacation Mode compatibility notes apply across PrestaShop versions and themes.
- PrestaShop versions: Compatible with PrestaShop 1.6.0 through 9.1.
- Multishop: Activate: is stored per shop. Configure vacations in the appropriate shop context.
- Themes: Display placement availability depends on your theme. Some hooks may not exist; use Use alternative position: where available. Reassurance info: placement varies by theme – in many default themes it appears on the product page, shopping cart, and checkout. See the PrestaShop hooks documentation for how hooks work in themes.
- Languages: Vacation message content supports all languages configured in your shop.
Data Scope
This Documentation Vacation Mode summarizes what Vacation Mode changes on your storefront and in the Back Office.
The Vacation mode module displays information and sends optional supplemental emails. It:
- Shows customizable HTML messages on the storefront
- Sends an additional email on order creation when that placement is enabled
- Displays an active-vacation reminder in the Back Office
- Disables add-to-cart buttons and blocks new cart additions when Disable Add to cart is enabled (optionally with a visitor explanation)
It does not:
- Enable PrestaShop catalog mode (unless you enable that separately in shop settings)
- Hide products or categories from the catalog
- Automatically modify shipping dates, order statuses, or delivery estimates
- Replace PrestaShop's standard order confirmation email
Disable Add to cart greys out purchase buttons and blocks new additions during an active vacation but does not prevent checkout for existing cart contents.


